Tuesday, March 23, 2010

Designing Costumes for Disguise

For 11 years I have worked for Disguise making Halloween product. My primary job is designing and sculpting accessories, but I also contribute costume ideas.  Here are some designs, and the costumes that they became. At Disguise, I provide the design concept, which is interpreted by a costume designer. If graphics are needed, that is handled by the Creative Services department. Once they have a mock up of a costume, I give input on the construction and graphics. We only have an allotted amount of money to  work with, so more often than not, we cannot afford some of the elements in my designs. In most cases, I also sculpt and paint the components that accompany the costumes.  Click on any of the images to see full size.

For these two military designs, I  had some time to think through and develop them properly. Everything was done in Photoshop. The completed costumes turned out OK, but there was so much more I would have loved to see.


I'm a huge industrial goth fan so when they asked for me to contribute to the Rot"N" Rocker line, I jumped at the chance to make the creepiest rocker on earth. Even though we could not afford to do the pants,  I was very impressed by how it all come out in the final costume.


This was originally going to be a vampire knight, but the executives didn't get it. So, he became the black knight once I added a helmet. My initial inspiration was in re-purposing a chest piece I did on a costume that was canceled a few years back. I thought with a new paint job that it was worth saving. So far, the buyer response has been great.


I had such high hopes for this one when I designed it. I was responsible for the sculpts and am proud of them, but the actual costume really falls short.


I was trying to make these designs with the parchment back round look; like they all came from the same world, ancient, and horrific. Here are a couple more  that I really liked. The Crypt vampire made it as an essential costume, but "The Monster" lost over the Black Knight and Reaper.

This was a fun little design I did in 2008. They were looking for a twist on a skeleton costume. I was inspired by things I'd seen in some issues of Heavy Metal comics.

 This is my all-time favorite costume I did for Disguise back in mid 2000. No one was saying, make a demon, or vampire, so I made what I wanted to make. I did dozens of sketches, but the one pictured is the closest to how it turned out. It looked amazing, but we could not get the factory to make the vacuum-form plastic armor in the correct thickness resulting in a brittle costume.

  These are other designs for the Biomech that I would still love to make.

I've done tons on ninjas, but these two represent two of my favorite designs.  The one on the left is supposed to be the very first ninja from ancient barbaric times, and the one on the right is a modern day ninja. Both are from the same clan and share a dragon insignia on their belts.
 Every boy at age 7 or 8 wants to be a ninja, I know this because I was.

 This was a idea and design I had for a pitch to try and get the Star Wars license. It never saw the light of day, but it was a blast to work on.

Once in a while I like to just draw stuff in my spare time at home. This was a fun project I did in 2008 that taught me a lot about coloring in Photoshop.

Friday, December 18, 2009

Creating ADAM for the "AUTOMATED RESURRECTION" sculpture


Before I blog about how I painted the hatch, I wanted to talk about how I made the Adam figure. It all started with my ambition to make another stop-motion film to extend the story with the Eva character I made in my first short, STASIS. I'm still in the process of making STASIS 2, but part of this journey is sharing the fun experiences along the way. Each thing we do has a story attached to it. This particular sculpture took me through a long 3-year journey. I always have 4 or 5 things happening at once; most of which are at my day job sculpting and designing products for companies like Marvel, Disney, and Hasbro. When I have the time and energy, I like to make things that go far beyond the constraints I have to deal with in the product world. I rather enjoy telling people how I make things, because teaching someone something is to learn it twice and perfect it.

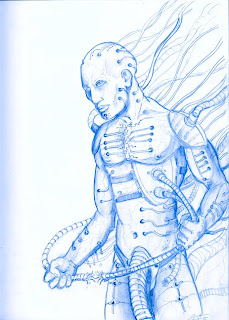
Before I begin a sculpture, I sketch, gather references, and think about what the characters function or purpose is in the script. In Adam's case, he's been in cryogenic storage for a long period of time. He's waiting for the day medical science can correct a near fatal car accident that left him paralyzed. With this information in mind, I began to think about what the Hospital of the future might look like, what the doctors and nurses might be like, and what kind of technology might be employed in this miraculous rehabilitation.


Since Eva stood 13 inches, I decided to make Adam 14 inches. I started with finding a good image of a skeletal structure and then blew it up to actual size. I used this to build an armature using 1/8" & 1/4" aluminum wire for the overall structure, epoxy putty for bones, and small gauge steel wire for fingers. I then wrapped it all with metal floral wire, which helps the clay stick.


I employed a mixture of Supersculpy and Fimo polymer clay to make the clay a darker shade. When I plan on molding a sculpture and I’m using Supersculpy, I like mixing a darker shade of clay. This serves two purposes: Supersculpy alone has a translucency, which makes it difficult to see your fine surface smoothness. Also, mixing in another color strengthens and conditions the clay. I use 1 pound of Supersculpy for every 56grams (one small block) of soft brown Fimo clay for my mix.    


This character is eventually going to be a stop-motion puppet, so I had to pose him in a very static position for flexibility. Notice how the arms and legs are slightly bent. That is so I know exactly where to put the joints; and exactly when it’s posed in its natural bends and creases. Most people like to make the ball and socket armature first, but I prefer to sculpt the character first then have the armature made to fit. I find that it gives the artist more freedom to be as true to the design or character as possible. Plus you never know when or where another arm or mandible on your creature would look good. I accredit an old instructor, Rick Catazone, he taught me that. He made puppets and animated sequences in Evil Dead II.


Once the "naked" version of Adam was completed, I made a silicone mold of him, cast a hard resin copy to sand any rough spots, and then sculpted an external suit using a harder clay called Castaline. The idea I had for Adam’s rehabilitation was a complex exo-suit made to stimulate muscle growth, movement, and protect him from injury. I pretty much abandon my initial sketches and just went for it with clay. I find that the best work I do sometimes is when I don't nail myself to a 2D sketch or design. Working in the 3rd dimension allows for so much more exploration and expression. I'm not saying that sketches are not necessary. I just want to illustrate that a sculpture can evolve as you work, making it ten times more enjoyable.

This was the first time I worked with Castaline clay. It was a bit sticky, but overall I enjoyed working with it, plus I gained the experience. I kept chopped up bits on a small electric tea warmer over aluminum foil. This kept it nice and soft to apply and shape. Then once it hardened, I'd go in and shape it with pallet metal tools. Most of the circuitry was done with an Xacto knife. I'm not certain of how long it took, because it was an hour or two here and fifteen minuets there. It felt like forever. I love to create details with tubes, wires, or whatever I can find. On this piece, I wanted to have as much control of the detail as possible. In other words, I did it the hard way. The only thing that bothered me about making him a puppet was that the fingers had to be slightly thicker than I wanted them to be in order to accommodate the armature within them. Next time I plan on making a larger puppet overall so I can avoid that. Sigh...a small price to pay for functionality sometimes.

Next, I went onto another silicone mold! Most people like to do 2 piece case molds. I say, the hell with that! I hate making walls! I lay it up in one piece, pour in one piece, and then cut that bitch in half! In this shot with Adam in the pink stuff, I was trying to show my cutting technique.

First I take an Xacto knife, a blow touch, and a pair of needle nose pliers to put a kink in the blade. Then I take that knife and SLOWLY cut the center of my dividing edge. This makes a nice gutter key all along the mold. To finish the cut, I take a long bladed box cutter and wiggle it as I cut through the rest of the silicone. This makes a ridged edge for the silicone pieces to mechanically bond to one other. The key to doing this technique is to GO SLOW and BE CAREFUL. One slip and next thing you know, your mold has a huge gash in it. It’s worth it to perfect this method, because you don't have to make dividing walls in the silicone clay layup, which can save oodles of time.


OK, now that I've ranted on about that…I'll explain a little about how I reposed and re-sculpted some of the parts for the finished sculpture (seen above). After I made some nice self skinning poly foam castings with an internal wire armature, I started playing with poses above the Hatch sculpture and thought to myself; WOW, this could be a cool art piece if I do this! Why not!? I positioned it in an angelic rising pose and before I knew it, I was back at it with more clay. I found areas I didn't like too much. Like the top of the head looking too Hellraiser-Pinheadish, so of course, I changed it. The hands were too big, so I made the feet bigger, plus I had to patch tons of air bubbles in the poly foam. I'm sure I could have done it a different way, but I somehow managed.

Then of course I remolded it yet again, for the third time now. But this time it was not so easy. I had to have a support in the back of the sculpture because it would not hold it self up. This meant I had to mold it as is with the jackets! I had to do a lot of planning and thinking before I began. I would like to explain how I did it, but I then I'd have to write a small instruction's booklet with diagrams and images. For the record I DO NOT RECOMMEND EVER DOING IT THIS WAY! This is a no-no. I'm lucky I ended up with a workable mold. People tell me to let it go when I'm done, but sometimes I just want to make an art piece too!


Anyway, finally, here are a couple shots of the first gray primered casting with Adam on the Hatch base. I used 3 pieces of bent all-thread to attach him so his feet hovered about a half-inch off the base. In my next post I'll cover how I painted and detailed the piece.
Thanks for reading!


Sunday, November 29, 2009

Molding the Hatch

Now that the Hatch/Door sculpt was complete, it was time to move on to the molding process yet again! First, I did a quick clay layup on my back porch.


Next, I made Hydrocal plaster jackets over the clay layup in my man cave.


After prying the mold apart and carefully cleaning off the clay layup, I took the sculpture and a 5-gallon bucket of Silicone to my friend David Lea's. Dave has a really nice degassing machine that removes the unwanted air from the silicone (first image bellow). Doing this extends the life of a mold. We carefully put the mold jackets back over the hatch sculpture and sealed it using plaster bandages. I remember after pouring the mold we had a hell of a time plugging the holes we used for letting the air escape. Silicone was everywhere! That night I learned to NEVER drill 1/4inch holes to bolt a mold together, it leaks. From now on I will clamp the mold together. Thank god for David's help that night!
                                          

Wednesday, November 11, 2009

Much needed post...


Damn, it’s been a while since I’ve posted anything. I wonder if any one is still even checking? I'm not sure where to begin. A lot has happened since I last posted anything. I guess I'll start with Monsterpalooza. In May I had the privilege of displaying and selling my work at the 1st annual Monsterpalooza show in Burbank California. Here is a shot of my booth. It wasn't a huge show like Comic-Con, but I've honestly never seen as much talent in one room. I ran into sculptors like Steve Wang, Jordu Schell, Paul Kimoda, and sooo many others. One in particular I recently discovered was Spider Zero (Simon Lee), WOW his work is awesome! In the midst of all the chaos I also saw some old friends like Greg Botcher, Elvis Jones, Russ Lukich, and one of my old teachers, Jerry Gergely. It was a great show and I can't wait till the next one, April 9th - 11th! If you want to find out more check out the website:
Hope to see you there!

Saturday, February 28, 2009

The FInished Sculpt!

Finished Sculpt!


OK, after months of a little sculpting here and a little sculpting there I finally completed the sculpture! It measures 22.625" H x 8.5" W x 11.5" D. The images above are desiderated in order to see the finished piece a little better. Otherwise, we see all the different colored parts I used. When I mounted the piece to a board for molding I decided to add the lower base over the pipe. It just seemed like the right thing to do, especially if I ever wanted to use the piece as a base for another sculpture.

Thursday, November 27, 2008

From Concept to Creature!


This was a fun monster mask I did for a raffle contest at the Transworld Halloween show in Los Vegas, March of 2008. I did a quick concept in Photoshop beforehand. Then at the show, I did a live demo of the entire sculpture. Mold maker Jason King molded it; afterwards we carefully transported it back to the shop. Finally I cast and painted it for the winner John K. in Utah. I threw in a working LED light for the robotic eye. Originally, the raffle winner was supposed to receive a custom character likeness mask of his or her own head, but John liked my demo piece so much, he asked for a mask of it instead. I guess John didn't want to wear a mask of himself for Halloween

Behind the Door Sculpture


At this point I started building the set using 1/8" & 1/4" sign white acrylic sheets. I leave the protective film on the acrylic until it is absolutely necessary to remove. The Deprivation chamber was a bitch to mount to that wall. It's about 15 lbs and 2 feet wide. I cleaned the casting of the door and carefully mounted it to the Deprivation tank with a hinge to make sure it worked. While ensuring the fit, the Deprivation tank fell and broke the door in 2. Luckily it was a clean break and I fixed it with no problem. Phew…


These photos show the in progress sculpt of the inside of the door. I have a very narrow opening, so the puppet has to fit just right or the door won't open. I decided to have some fun and just free form this sculpture. My inspiration came from clams. I'm using 2 kinds of oil base clays, Monster makers and Chavant's Y2-Klay. I used the denser Y2 first by laying in a 1/4" layer for smoothing out the inside of the door and the soft waxy Monster Makers for the actual sculpt. Usually, sculptors don't mix 2 kinds of clay for one sculpture because it can get kind of messy, but for this particular sculpture I wanted to make sure I didn’t carve in too deep. Having a different color at the base of my sculpture kept me from doing that. I learned this technique when I worked for a tire company as a sculptor and mold maker for a brief period in my life. They used different colors of plaster to layer the tire in order to identify how deep they were carving for each pitch (groove in the tire). Pretty clever.

Maxi-pad-Mold


I did a brush up mold on the door sculpture using Smooth On Mold Max 30 with an Ultracal jacket. It makes me laugh to look at this peculiar mold because it reminds me of a Maxi-Pad.

After de-molding, I cast one copy using another Smooth On product called Shell Shock; a brush-able resin that has a consistency between melted ice cream and peanut butter. As you can see the casting came out OK. Then it was time to clean it up and start the interior sculpture of the door.


I finished the door using clay, and some tubes and model parts. It was fun to sculpt. The centerpiece reminds me a little of Iron Man. I did this after I saw the movie.

Sunday, May 11, 2008

Sculpting the Door


After finishing the Deprivation tank sculpture, molding, and casting the beast of a piece, I am finally beginning the door! The white part is resin and the door is just Wed clay so far. It's based off of my design below, but I'm sure that I'll deviate.

Wednesday, February 13, 2008

Working the set sculpture in Photoshop


Here is a shot of the sculpture with a Photoshoped door design. It's sculpted in Wed clay and already weighs over 50 pounds! I like to take pictures at this stage, because it’s not finished and it's not too late to make changes. Keeping the creative flow throughout the entire process is the way I like to work. Never commit to a design when sculpting, because it can always evolve into something better!

New Set Piece for STASIS 2


For my next animation, the script requires a deprivation tank. For those of you who don't know what that is, see the movie Altered States! It's basically a huge tank a person floats in, where all 5 senses are put on pause. Anyway, I did a few designs, but I felt that they were looking too much like the pods in the Matrix. This tank also has to double as a machine character in the story, so it has to look interesting as well as intimidating. I stopped tying to sketch it because everything reminded me of something else I'd seen; then the inspiration hit me after marveling over my wife’s 6-month pregnant belly the other day.


Now I’m on a new mission; I made a grid on a nice piece of plywood, and took a piece from a gun I made for another project. I was about to sculpt, but then I thought; why not design it in Photoshop first!? I grabbed the camera, threw in the character that will be in the tank, and shot some photos of my crude armature. After about 1 hour of playing in Photoshop I came up with this. The character will slide out the center of the machine, and interact with the round object at the end of the tube. We actually only see the front of the tank here, and when it's closed it will look like a pregnant belly. I still have a bit of work to do on the sculpture, but it's coming along rather nicely.

Monday, February 11, 2008

Painted Monster...


Here is a nice layout of the completed ASCARAS monster. He has an internal wire armature and is made of a self-skinning polyfoam. I painted him using latex base paints and Createx airbrush paints. He was a blast to make and stands 22 inches tall! I painted 2 and one is for sale for $499. I'll post it in the store soon. Can't wait to animate this monster!

Friday, February 08, 2008

Whats new...


Recently, I have been getting back into illustrating in Photoshop for precision. I'm finding it too time consuming to sculpt all my characters for the next comic, so I am seriously considering digital illustration. J.P. Targete has a great instructional DVD series on Imaginative Illustration through the Gnomon workshop. I created the image above in gray scale first. This allows you to really concentrate all the values and lighting. Then I colored it by simply selecting areas and changing the hue and saturation. I still have a long way to go as far as developing a tighter look with better anatomy, but I'm having a lot of fun. I have to thank Marc Gabbana, the illustrator, for his awesome tips on what I could do to make my paintings look great.


Well the good news is, thanks to Jon Irons I am posting again. The bad news is, I lost my hitestudios.com website. About a month ago I received a notification that the hitestudios name was going to expire. When I started the website in 2001, I purchased it through yahoo along with web space, and had a portfolio website on it for 3 years. Then recently, we created a new site with a store that could not be on the yahoo server anymore due to some technical problems with the zen cart. So, I moved the site to A Small Orange and spent about 1500 on making the new site. When it came time to renew hitestudios 4 months after the new site was up, yahoo wasn't helping me. Technically, yahoo has all the password information for renewing hitestudios, therefore I couldn't renew without buying another plan with yahoo. I waited for it to expire then tried again to get it, but still ran into the same problem. I'm sure part of it was my ignorance of web hosting, but yahoo really didn't help. For now this will be the hub of Hitestudios. I do like the sound of Art Machine a lot better than hitestudios. I will be selling stuff on Etsy, and posting some images on flicker. I also have a myspace account link on this page as well.

Sunday, November 18, 2007

Silicone Case Molding a MONSTER!


Molding the body of Ascaras was a big task. Most of the materials including: Bubblegum Clay, and Silicone can be found online at the Burman Industries website called Monster Makers. The fiberglass resin and mat I used came from my local hardware store. OK! First, he was sealed in plastic wrap and covered in an even thickness of 3/8" water base clay. Photo 1 is of the finished clay layup, which is ready to start fiberglassing!


The clay layup is what makes the outer shell of the fiberglass jackets. After 3 days of working on my back porch, the fiberglass shell was finally ready to be assembled over the sculpture and to begin pouring silicone. This particular shell is in 3 pieces as seen in picture 2.


Picture 3 looks like a leaky disaster, but actually the fiberglass jacket is filled with small air holes so when we pour the liquid silicone all the trapped air can escape. I used 3-inch zip screws to plug the holes after I let them bleed out a little. The white stuff around the mold are fast setting plaster bandages to help seal the fiberglass jackets together. I wanted leaks, but not at the seams of the mold. Then 8 hours later the silicone sets up and wallah! We have a silicone case mold! I then carefully take off the jackets and cut the seam line of the mold to free the sculpture within.


After cleaning and prepping the mold I poured a hard resin casting. I use this for a master tool. Which basically means when the mold dies after many castings I can re-mold Ascaras using this master tool. If you are serious about Case molding I recommend looking for how to DVD tutorials online from Gnomon workshops or Mark Alfrey DVD's on how to's. Remember that a mold maker’s best friend is his release agent, which is most likely Petroleum Jelly!


In the next post I'll show the final poseable casting of Ascaras and explain the process.