Saturday, February 28, 2009

The FInished Sculpt!

Finished Sculpt!


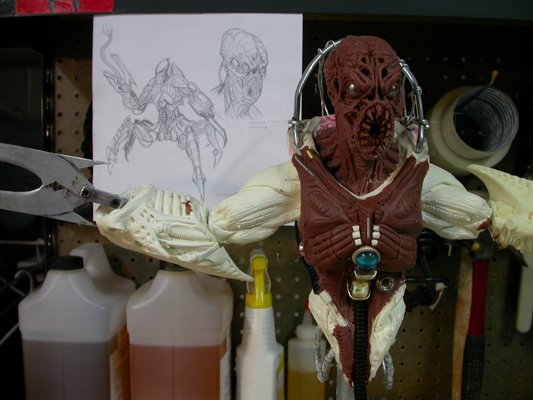
OK, after months of a little sculpting here and a little sculpting there I finally completed the sculpture! It measures 22.625" H x 8.5" W x 11.5" D. The images above are desiderated in order to see the finished piece a little better. Otherwise, we see all the different colored parts I used. When I mounted the piece to a board for molding I decided to add the lower base over the pipe. It just seemed like the right thing to do, especially if I ever wanted to use the piece as a base for another sculpture.

Thursday, November 27, 2008

From Concept to Creature!


This was a fun monster mask I did for a raffle contest at the Transworld Halloween show in Los Vegas, March of 2008. I did a quick concept in Photoshop beforehand. Then at the show, I did a live demo of the entire sculpture. Mold maker Jason King molded it; afterwards we carefully transported it back to the shop. Finally I cast and painted it for the winner John K. in Utah. I threw in a working LED light for the robotic eye. Originally, the raffle winner was supposed to receive a custom character likeness mask of his or her own head, but John liked my demo piece so much, he asked for a mask of it instead. I guess John didn't want to wear a mask of himself for Halloween

Behind the Door Sculpture


At this point I started building the set using 1/8" & 1/4" sign white acrylic sheets. I leave the protective film on the acrylic until it is absolutely necessary to remove. The Deprivation chamber was a bitch to mount to that wall. It's about 15 lbs and 2 feet wide. I cleaned the casting of the door and carefully mounted it to the Deprivation tank with a hinge to make sure it worked. While ensuring the fit, the Deprivation tank fell and broke the door in 2. Luckily it was a clean break and I fixed it with no problem. Phew…


These photos show the in progress sculpt of the inside of the door. I have a very narrow opening, so the puppet has to fit just right or the door won't open. I decided to have some fun and just free form this sculpture. My inspiration came from clams. I'm using 2 kinds of oil base clays, Monster makers and Chavant's Y2-Klay. I used the denser Y2 first by laying in a 1/4" layer for smoothing out the inside of the door and the soft waxy Monster Makers for the actual sculpt. Usually, sculptors don't mix 2 kinds of clay for one sculpture because it can get kind of messy, but for this particular sculpture I wanted to make sure I didn’t carve in too deep. Having a different color at the base of my sculpture kept me from doing that. I learned this technique when I worked for a tire company as a sculptor and mold maker for a brief period in my life. They used different colors of plaster to layer the tire in order to identify how deep they were carving for each pitch (groove in the tire). Pretty clever.

Maxi-pad-Mold


I did a brush up mold on the door sculpture using Smooth On Mold Max 30 with an Ultracal jacket. It makes me laugh to look at this peculiar mold because it reminds me of a Maxi-Pad.

After de-molding, I cast one copy using another Smooth On product called Shell Shock; a brush-able resin that has a consistency between melted ice cream and peanut butter. As you can see the casting came out OK. Then it was time to clean it up and start the interior sculpture of the door.


I finished the door using clay, and some tubes and model parts. It was fun to sculpt. The centerpiece reminds me a little of Iron Man. I did this after I saw the movie.

Sunday, May 11, 2008

Sculpting the Door


After finishing the Deprivation tank sculpture, molding, and casting the beast of a piece, I am finally beginning the door! The white part is resin and the door is just Wed clay so far. It's based off of my design below, but I'm sure that I'll deviate.

Wednesday, February 13, 2008

Working the set sculpture in Photoshop


Here is a shot of the sculpture with a Photoshoped door design. It's sculpted in Wed clay and already weighs over 50 pounds! I like to take pictures at this stage, because it’s not finished and it's not too late to make changes. Keeping the creative flow throughout the entire process is the way I like to work. Never commit to a design when sculpting, because it can always evolve into something better!

New Set Piece for STASIS 2


For my next animation, the script requires a deprivation tank. For those of you who don't know what that is, see the movie Altered States! It's basically a huge tank a person floats in, where all 5 senses are put on pause. Anyway, I did a few designs, but I felt that they were looking too much like the pods in the Matrix. This tank also has to double as a machine character in the story, so it has to look interesting as well as intimidating. I stopped tying to sketch it because everything reminded me of something else I'd seen; then the inspiration hit me after marveling over my wife’s 6-month pregnant belly the other day.


Now I’m on a new mission; I made a grid on a nice piece of plywood, and took a piece from a gun I made for another project. I was about to sculpt, but then I thought; why not design it in Photoshop first!? I grabbed the camera, threw in the character that will be in the tank, and shot some photos of my crude armature. After about 1 hour of playing in Photoshop I came up with this. The character will slide out the center of the machine, and interact with the round object at the end of the tube. We actually only see the front of the tank here, and when it's closed it will look like a pregnant belly. I still have a bit of work to do on the sculpture, but it's coming along rather nicely.

Monday, February 11, 2008

Painted Monster...


Here is a nice layout of the completed ASCARAS monster. He has an internal wire armature and is made of a self-skinning polyfoam. I painted him using latex base paints and Createx airbrush paints. He was a blast to make and stands 22 inches tall! I painted 2 and one is for sale for $499. I'll post it in the store soon. Can't wait to animate this monster!

Friday, February 08, 2008

Whats new...


Recently, I have been getting back into illustrating in Photoshop for precision. I'm finding it too time consuming to sculpt all my characters for the next comic, so I am seriously considering digital illustration. J.P. Targete has a great instructional DVD series on Imaginative Illustration through the Gnomon workshop. I created the image above in gray scale first. This allows you to really concentrate all the values and lighting. Then I colored it by simply selecting areas and changing the hue and saturation. I still have a long way to go as far as developing a tighter look with better anatomy, but I'm having a lot of fun. I have to thank Marc Gabbana, the illustrator, for his awesome tips on what I could do to make my paintings look great.


Well the good news is, thanks to Jon Irons I am posting again. The bad news is, I lost my hitestudios.com website. About a month ago I received a notification that the hitestudios name was going to expire. When I started the website in 2001, I purchased it through yahoo along with web space, and had a portfolio website on it for 3 years. Then recently, we created a new site with a store that could not be on the yahoo server anymore due to some technical problems with the zen cart. So, I moved the site to A Small Orange and spent about 1500 on making the new site. When it came time to renew hitestudios 4 months after the new site was up, yahoo wasn't helping me. Technically, yahoo has all the password information for renewing hitestudios, therefore I couldn't renew without buying another plan with yahoo. I waited for it to expire then tried again to get it, but still ran into the same problem. I'm sure part of it was my ignorance of web hosting, but yahoo really didn't help. For now this will be the hub of Hitestudios. I do like the sound of Art Machine a lot better than hitestudios. I will be selling stuff on Etsy, and posting some images on flicker. I also have a myspace account link on this page as well.

Sunday, November 18, 2007

Silicone Case Molding a MONSTER!


Molding the body of Ascaras was a big task. Most of the materials including: Bubblegum Clay, and Silicone can be found online at the Burman Industries website called Monster Makers. The fiberglass resin and mat I used came from my local hardware store. OK! First, he was sealed in plastic wrap and covered in an even thickness of 3/8" water base clay. Photo 1 is of the finished clay layup, which is ready to start fiberglassing!


The clay layup is what makes the outer shell of the fiberglass jackets. After 3 days of working on my back porch, the fiberglass shell was finally ready to be assembled over the sculpture and to begin pouring silicone. This particular shell is in 3 pieces as seen in picture 2.


Picture 3 looks like a leaky disaster, but actually the fiberglass jacket is filled with small air holes so when we pour the liquid silicone all the trapped air can escape. I used 3-inch zip screws to plug the holes after I let them bleed out a little. The white stuff around the mold are fast setting plaster bandages to help seal the fiberglass jackets together. I wanted leaks, but not at the seams of the mold. Then 8 hours later the silicone sets up and wallah! We have a silicone case mold! I then carefully take off the jackets and cut the seam line of the mold to free the sculpture within.


After cleaning and prepping the mold I poured a hard resin casting. I use this for a master tool. Which basically means when the mold dies after many castings I can re-mold Ascaras using this master tool. If you are serious about Case molding I recommend looking for how to DVD tutorials online from Gnomon workshops or Mark Alfrey DVD's on how to's. Remember that a mold maker’s best friend is his release agent, which is most likely Petroleum Jelly!


In the next post I'll show the final poseable casting of Ascaras and explain the process.

Wednesday, October 24, 2007

Cannabilizing A Creature!


When I started this Blog in 2006, I showed some of the beginning steps of my Ascaras puppet. Now that I'm back, I feel like I can post some more images on just how Ascaras was made. I used a combination of different clays over a resin base from a former sculpture called Syferous (first Image). I used Syferous' torso as the base, and then created Ascaras' chest and head in supersculpy, because I had a specific design in mind. I made his arms and thorax in Magic Sculpt. Epoxy clay is great for free form designs. Magic sculpt gives you a time limit, so I had to work fast when I took on some of the larger areas.


I used an oil-based clay for his claws; I was in a hurry to finish him at this point. Also, notice the resin pieces parts I cast and used for mechanical details. I'm always on the lookout for interesting parts to jam into my sculptures.


As for the legs, I decided to make 4 instead of 6 on the character (easier to animate). To also make things easier, I just made one leg sculpture out of Magic Sculpt, plastic/resin parts, and some neat bones I found on the beach.


Then the leg was molded in a two-piece silicone mold. Here I am finishing up the clay wall that my buddy Jason King started for me.

Molding the body of Ascaras was a much harder undertaking, which took me about a week. I'll get into that on my next post.

Friday, October 19, 2007

I AM BACK!


Well, it’s been a while since my last blog...so, here I am with some long awaited news. I did a comic to extend the story STASIS, which reveals 3 new characters including SYFEROUS. I decided to try and maintain the same feel and look of the original STASIS stop-motion animated short by using photographs of the actual puppets and sets. Of course Photoshop had a big hand in the creation as well. The first 32 page issue is now available on my revamped hitestudios.com website for $4.50, including free shipping along with some of the puppets and props from the film and brand new book.


It was a long road and a lot happened in between the making of this comic. I started it at the end of January 2006, and about 3 weeks into the project my bother was in a terrible car accident. I sat in the hospital watching, hoping, and praying for my brother to hang on. After 2 months in a coma and 3 major surgeries, he made it out alive enough to start a full year of rehabilitation. I think I could write a book about what my family went through that year. I don't think I actually got back to the book until 5 or 6 months later, but I had a new perspective on life.


My bro is now almost fully recovered, with his wife, and newborn daughter; life is a miracle! After getting back, completing the story, and showing it at Comic-Con 2006, I decided that the book wasn't done, so I revamped the entire comic and released it for Comic-Con 2007. The response has been great! We sold about 150 issues at the Con and the continuation is going to be another animated short, which I am tentatively calling A.R.K. I'm very excited about this new project and will start getting into the habit of posting more so please visit again!! -J.Hite

Monday, July 17, 2006

BEGINNING THE SCULPTURE


I started this sculpture by cannibalizing another sculpture. Ascars is a soldier created to serve Syferous. I took a bad casting of Syferous and made some adjustments with my ban saw and dremel; then I mounted the remains onto a steel pipe about 8-inches off a 1 foot circular base. In this photo, the white parts are what I took from Syferous. The brown clay is a mixture of Super Sculpy and Fimo clay. This was only the beginning!


The creation of Ascaras


I've always loved the look and movement of insects, spiders, and crustaceans. They are so alien to us 2-legged Homo sapiens. These creatures are the true biological machines of our planet, and I guess that is what inspired me to make Ascaras. About 6-months ago I sketched this four-legged Biomechanical creature. Most of the sculptures I do are sketched out several different times. Although, sometimes I don't sketch at all, because I can already see it in my head. This particular sketch was more like a study of a multi-limbed being. I tried to keep it simple so I could elaborate as I sculpted. I wanted to make sure I had clear direction on the head, which would be underneath a helmet that split down the center; so I sketched it separately, with a little more detail after seeing some creepy pictures of Lamp Rays. Overall this sketch gave me just enough detail to work from, so I started the sculpture.

Sunday, July 16, 2006

THE BECOMING


Well, here goes my very first post. I'm starting this blog to show some of my work and techniques in sculpting, design, and film.